If you’re wondering how to whitelist a website, you’re in the right place and it’s probably how you ended up on this article.
As a Mac user, I understand how crucial it is to manage web access effectively. I take cybersecurity very seriously when it comes to keeping my browsing experience safe.
Whether you are a Mac user like myself or using another operating system like Windows, I will go over everything you need to know so you can stop asking yourself, how to whitelist a website.
First off, let’s clear up what it means to whitelist or blacklist a website.
When I whitelist a website, I’m making sure it gets through any internet filters I have, guaranteeing uninterrupted access.
Think of it as creating a VIP list for the websites you trust and visit often.
Blacklisting, on the other hand, is like having a guard that keeps harmful or unwanted sites away.
In this guide, I’ll show you how to whitelist URLs on your Mac AND Windows PC, explain why sometimes it’s necessary to blacklist sites, and also help you overcome common issues you might encounter.
Let’s dive in and make your online experience both smoother and safer!

Why Whitelist? The Importance of whitelisting a website
Have you ever been frustrated by a website that just won’t load due to internet settings?
Whitelisting is your solution.
It’s like having an always allowed list for your favorite websites.
Here’s why it’s beneficial:
- Uninterrupted Access: Your favorite, frequently visited sites are always available.
- Efficiency: No more wasting time trying to access blocked sites that are safe and useful.
Blacklisting: Your Digital Shield
What about the websites you wish you’d never clicked on?
That’s where blacklisting comes in.
Think of it as your personal internet filter, keeping unwanted websites out.
Here’s how it helps:
- Safety: Keeps potentially harmful or unsafe websites at bay.
- Focus: Minimizes distractions by blocking sites that aren’t relevant or needed.
Both whitelisting and blacklisting empower you to shape your online environment.
Whether it’s smooth access to your go-to websites or avoiding the bad apples, you’re in control.
Up next, I’ll guide you through managing these lists on your Mac. (We’ll also cover how to do this on Windows too)
How to Whitelist a Website on a Mac
Need to block certain websites on your Mac?
It’s simpler than you think with Screen Time settings within your Mac.
Here’s your easy guide to setting up website restrictions:
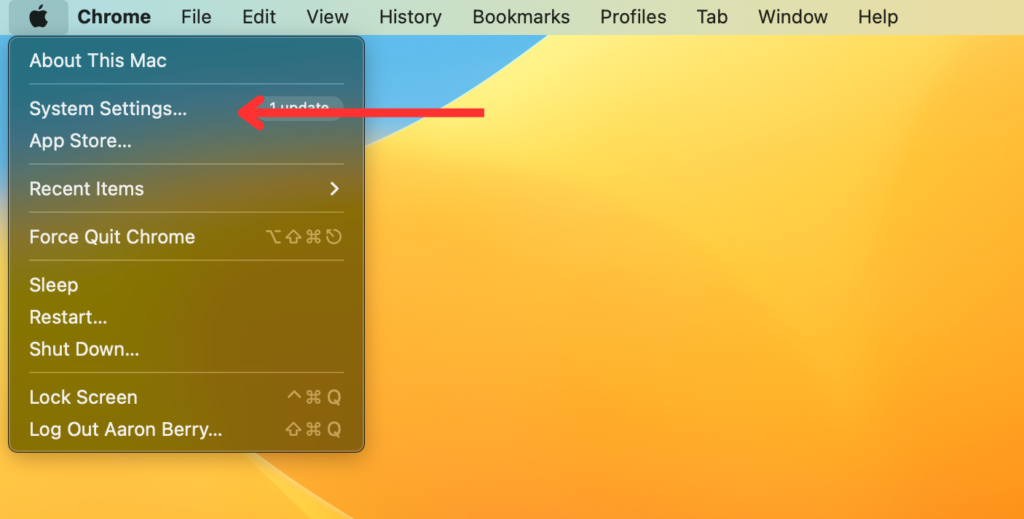
1. Access System Preferences
Click the Apple icon in the top-left corner of your screen and select System Settings.
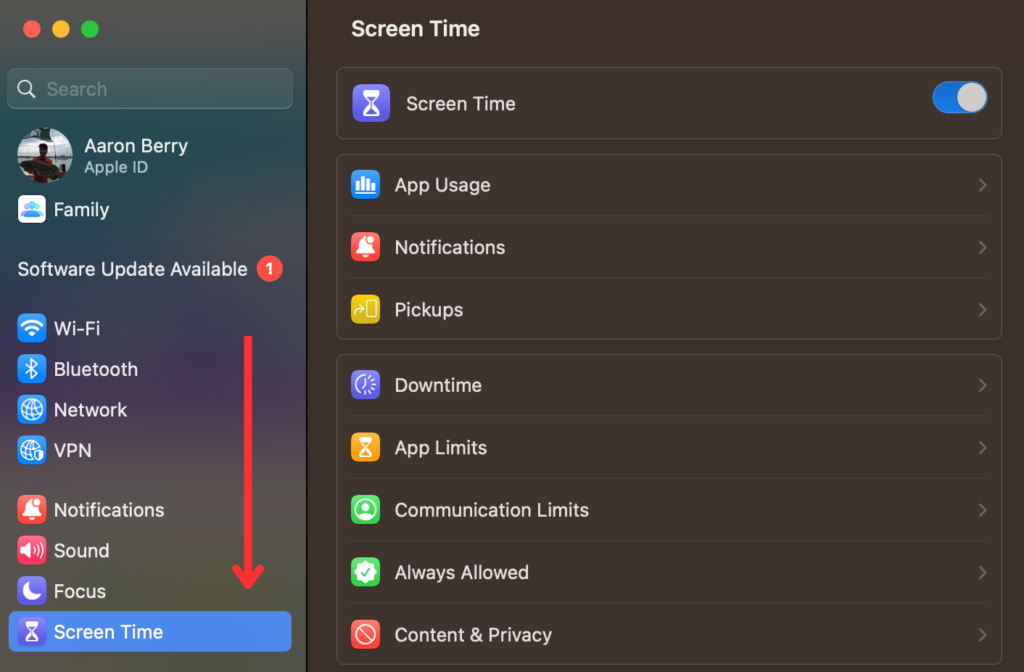
2. Open Screen Time
In the System Preferences window, click on Screen Time.
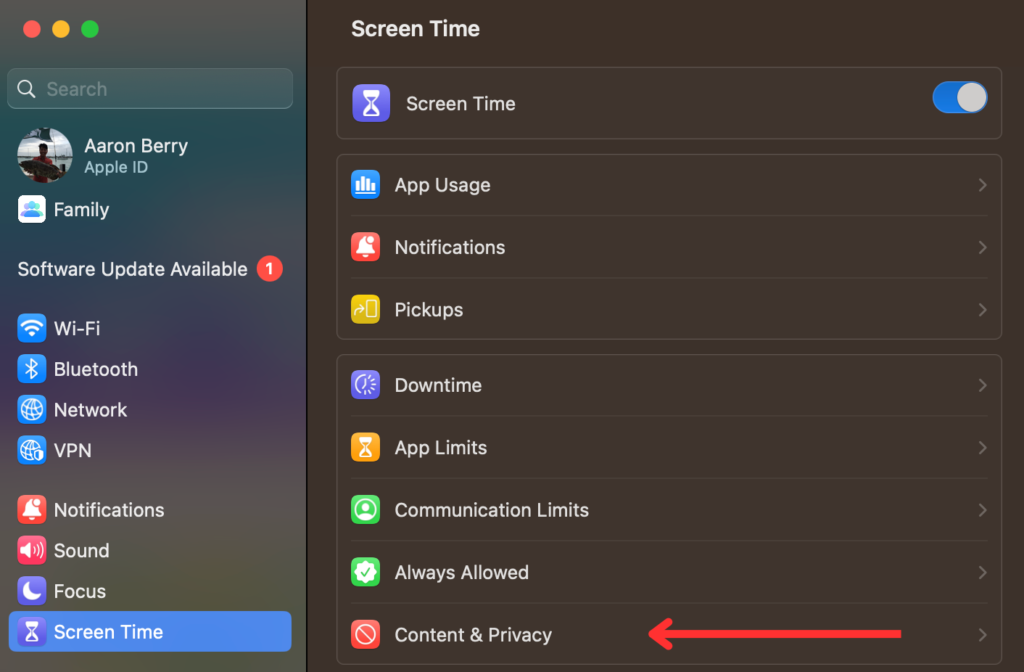
3. Navigate to Content and Privacy
Select Content and Privacy from the left sidebar.
4. Enable Content and Privacy Restrictions
If it’s not already turned on, click Turn On in the top-right corner of the window to enable these restrictions.
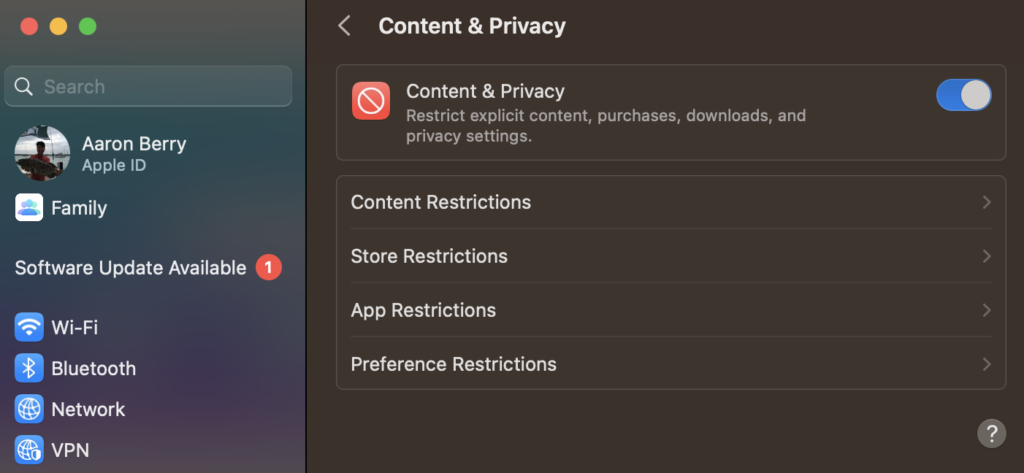
5. Allowed Websites Only and Customize
Click on Content Restrictions and it will bring you to a new window.
Under Web Content, you can open a dropdown. Choose Allowed Websites Only under Web Content.
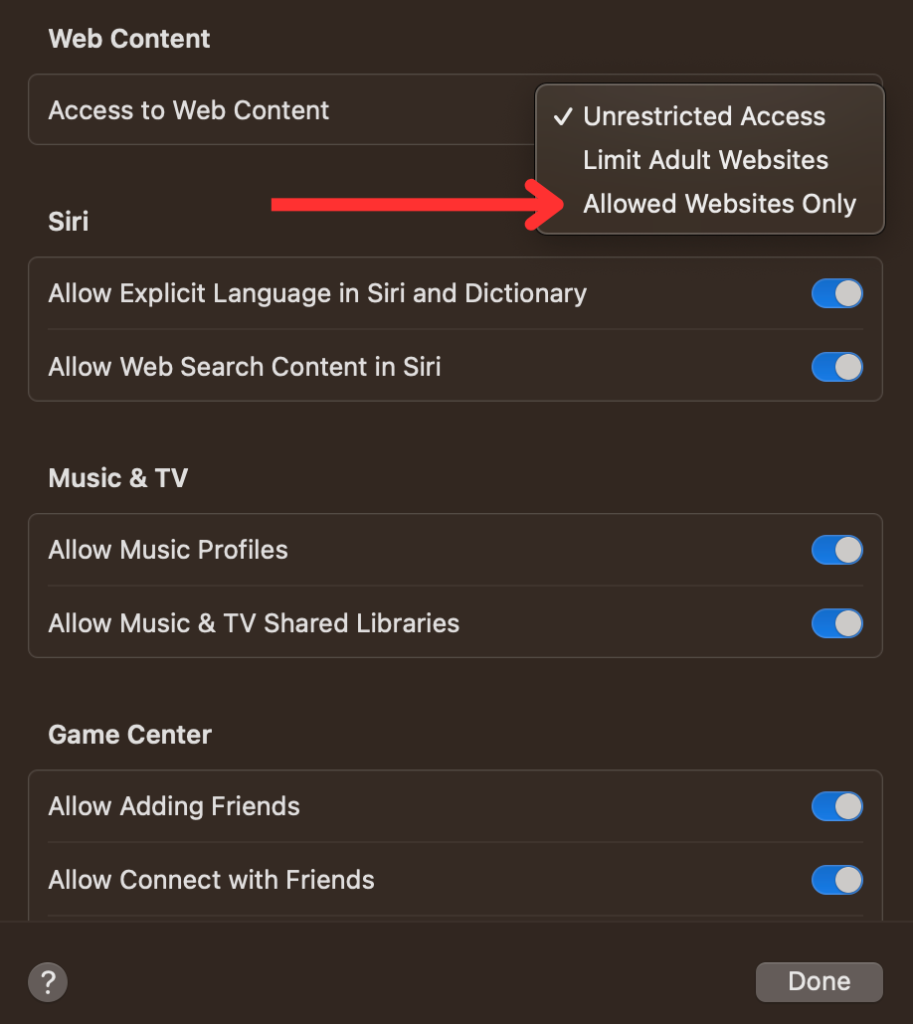
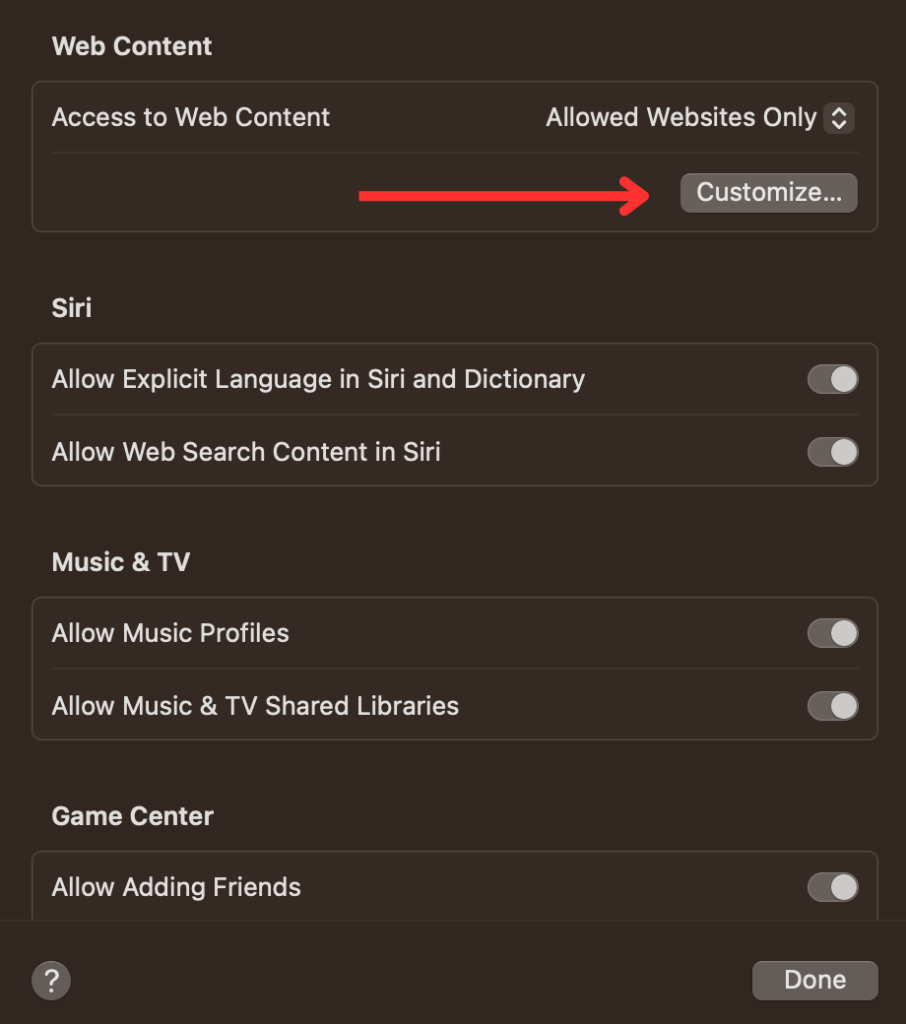
6. Manage Allowed Websites
Now you should see a button called Customize. Click on that to open up the window that lets you add the URLs you want to allow.
7. Add Sites to the Restricted Section
Under the Restricted section, click the plus (+) symbol to add websites you want to block.
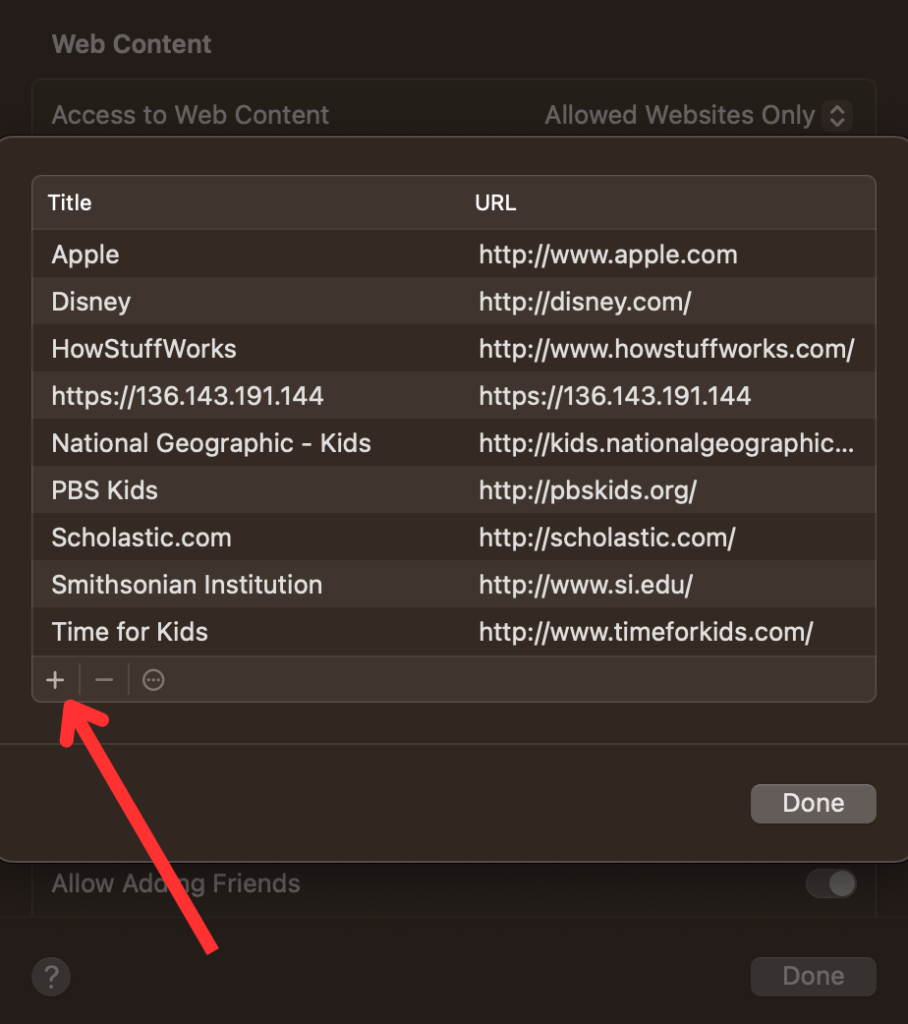
8. Enter the Website URL
Type in the URL of the website you wish to block and click Done.
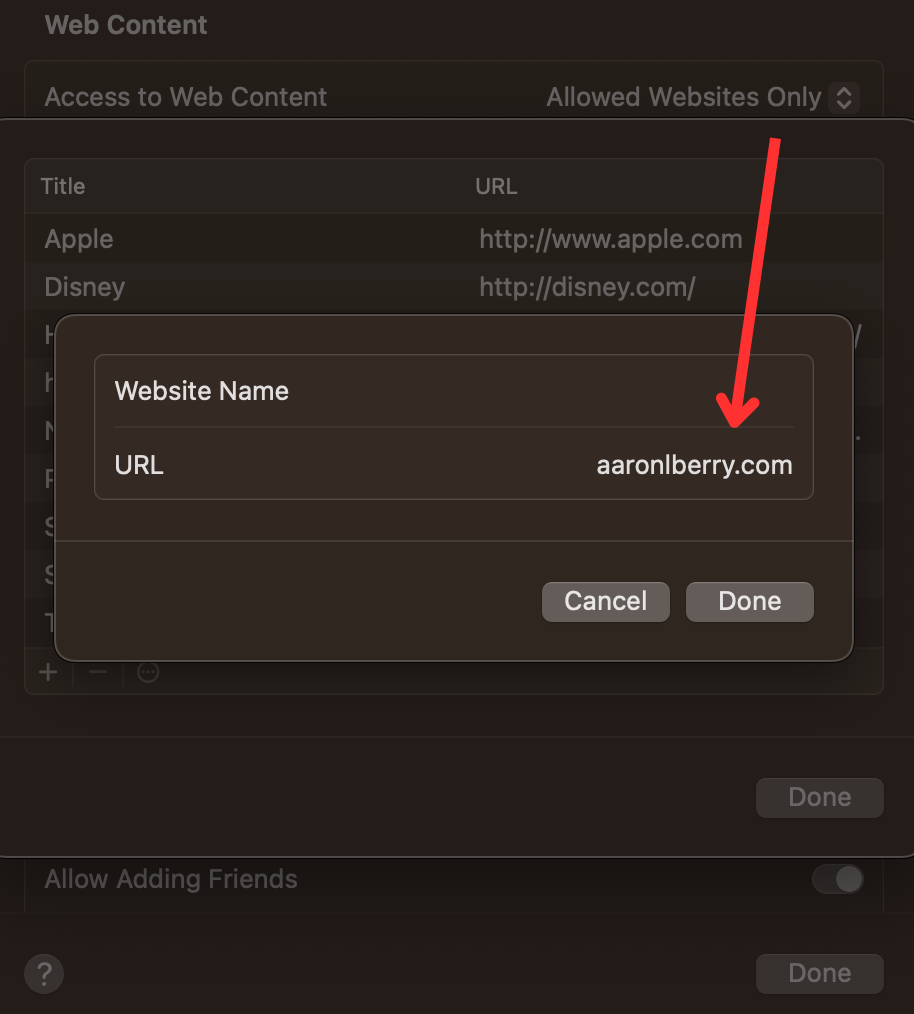
9. Confirm Your Settings
After adding all desired websites to the block list, click Done to confirm and apply your settings.
And that’s it!
You’ve successfully set up website restrictions on your Mac.
Next, we’ll explore how to do similar settings for Windows users.
A guide on How to whitelist a website on windows
Are you a Windows user looking to manage your web access effectively?
Whether you need to ensure constant access to certain sites (whitelisting) or block specific ones (blacklisting), Windows provides straightforward solutions.
Let’s explore how to set this up.
How to Whitelist a Website on Windows
For whitelisting websites, Windows users can rely on their browser settings or third-party applications.
Here’s a general approach:
- Open your preferred browser and go to its settings or options menu.
- Look for privacy or security settings where you can manage site access.
- Add the URLs of the sites you always want to allow to a whitelist or exceptions list.
- Save your changes to ensure these sites are always accessible.
Blacklisting Websites on Windows
Blocking unwanted websites on Windows can be done through built-in parental controls or browser settings.
Follow these steps:
- Access the ‘Family Options’ section in your Windows Settings.
- Set up or select a child account for applying these restrictions.
- Navigate to the ‘Content restrictions’ and then to the ‘Web browsing’ section.
- Add the URLs you want to block under ‘Always blocked.’
- Confirm your settings to activate the website blocks.
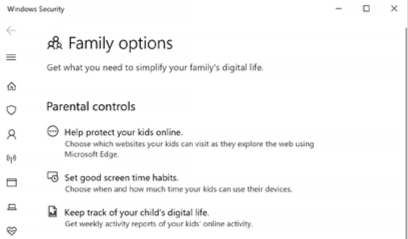
These steps will help you tailor your online experience on Windows, ensuring you have access to the sites you need while blocking the ones you don’t.
Next, we’ll discuss general reasons for blacklisting and how it can benefit your digital life.
Blacklisting URLs: When and How to Block Access
Have you ever clicked on a website and immediately regretted it?
Or found yourself constantly distracted by certain sites?
That’s exactly why blacklisting is essential.
It’s about creating a ‘no-entry zone’ for websites that aren’t beneficial or appropriate.
Here are some key reasons you might want to blacklist a site:
- Security: Keep yourself safe from sites known for malware or phishing.
- Productivity: Avoid sites that distract you from work or studies.
- Content Control: Prevent exposure to inappropriate or harmful content, especially in family or professional settings.
General Steps to Blacklist a Website
While the specific steps to blacklist a website depend on your device and browser, the general approach remains quite similar across platforms:
- Go to your device’s or browser’s settings, and find the parental controls or security options.
- Locate the section for managing website access or restrictions.
- Manually input the URL of the website you wish to block.
- Ensure to save your settings to activate the changes.
How To Whitelist a Website on Chrome
Step 1: Navigate to the website you want to whitelist.
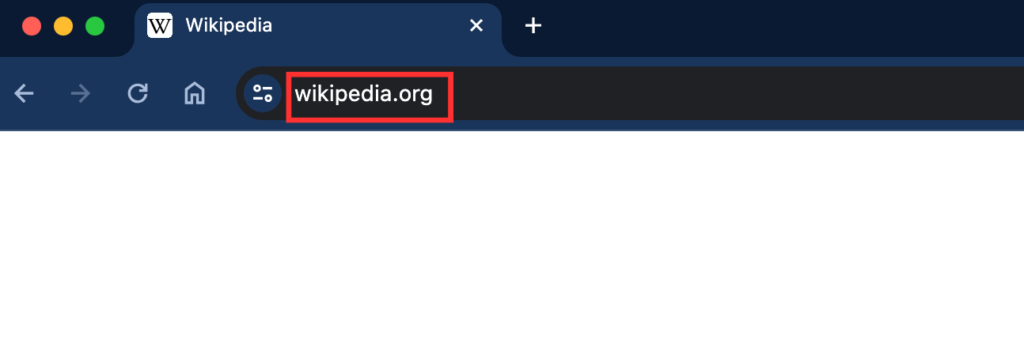
Step 2: Click on the info icon next to the URL input. (it might also be a lock or warning icon)
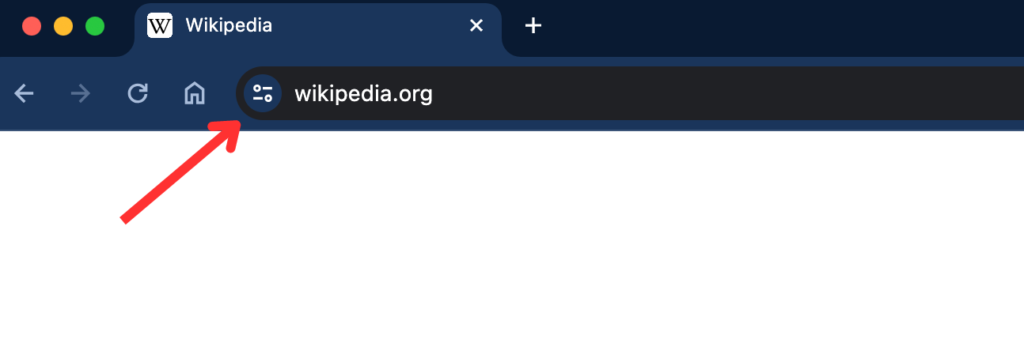
Step 3: Click on Site Settings
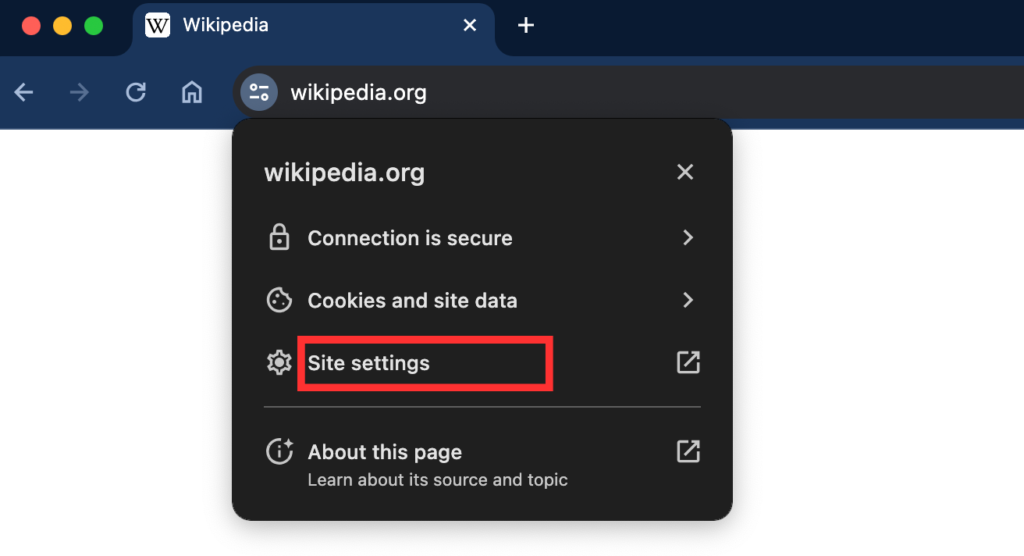
Step 4: Manage the website’s permissions, changes are saved automatically.

Blacklisting isn’t just about blocking unwanted content; it’s a proactive step toward creating a safer, more focused online environment for you and those around you.
With these simple steps, you can effectively manage your digital space to better suit your personal or professional needs.
Remember, maintaining a balanced and healthy digital life involves both knowing what to let in (whitelisting) and what to keep out (blacklisting).
By mastering these tools, you can ensure a more secure and productive online experience.
The challenges of how to whitelist a website
As you start to fine-tune your web access through whitelisting and blacklisting, you might bump into a few challenges.
Don’t worry, though – it’s all part of the process.
Let’s tackle some common issues and find solutions together!
Challenge 1: Accidentally Blocking Essential Websites
It happens!
You might find yourself unintentionally blocking a website you actually need.
Here’s the fix:
- Quick Solution: Double-check your blacklist. If you find the site there, simply remove it or add it to your whitelist.
- Preventive Measure: Regularly review your lists to ensure they reflect your current needs.
Challenge 2: Updates Resetting Your Settings
Sometimes, browser or system updates can reset your whitelisting or blacklisting settings.
Here’s how to handle this:
- Stay Prepared: Keep a backup of your lists or note them down. After an update, quickly reapply your settings.
- Regular Checks: Post-update, always verify if your settings are intact.
Challenge 3: Finding the Right Balance
Striking a balance between too much and too little web access can be tricky.
Consider these tips:
- Periodic Assessment: Regularly assess your web usage. Adjust your whitelists and blacklists as your browsing habits evolve.
- Feedback Loop: Pay attention to how changes affect your browsing experience and adapt accordingly.
Remember, whitelisting and blacklisting are dynamic processes. They evolve as your online habits and needs change.
By staying vigilant and adaptable, you can create a digital environment that truly serves you well.
Armed with these insights and solutions, you’re now better prepared to handle the ebbs and flows of managing web access.
Keep experimenting, and you’ll find the perfect setup that works just for you!


